Not much can be more infuriating and ruin a perfectly good bike ride than hearing a persistent creaking and not knowing where it’s coming from. Your ears may deceive you, and the creak you were convinced was coming from the back of your bike all ride was actually coming from the front wheel after you put it on the stand to investigate.
Thankfully, most creaks are fairly easy to find and fix. Usually, the creak is just a way of letting you know that something needs to be greased or tightened.
Occasionally, the creak is actually a warning of imminent failure, so it’s best to investigate a creak as soon as you can, not only for your sanity but for your safety as well. Let’s check out a few of the common ones and see if you can locate the culprit:
Headset, Bars, and Stem Creak
 To check if creaking may be coming from your bar, stem, or headset, straddle the bike while standing and put your weight on your handlebars, wiggling them slightly. If you hear creaking, then make sure that the contact surfaces – where the bar goes inside the stem and where the fork’s steerer tube go inside the stem – are properly greased, and while you have everything loosened apply some fresh grease to your stem bolts as well. Tighten everything down with a torque wrench to the manufacturer’s specifications.
If you want to check if your headset may be loose, turn the handlebars 90 degrees from straight so that the wheel is perpendicular to the frame, and then try to rock the bike forward and backward. If something feels loose or clicks, then chances are your headset needs to be tightened. Loosen the stem bolts at the steerer tube, tighten down the top cap to spec, and then re-tighten the stem bolts. As always, be sure not to over-tighten any bolts here, especially if your components are carbon fiber.
Cranks, Pedals, and Bottom Bracket
If you think the creak may be coming from your crank area, ride on a quiet road and stand and pedal out of the saddle while trying to reproduce the creak. If the creak persists, it may be from the crank area, but if you cannot hear it then it may be from the saddle or seat post.
 While bottom brackets are not always the source of the creak, the influx of press-fit bottom brackets over the last few years has made them the number one scapegoat for creaking thanks to poor manufacturing tolerances and an overwhelming amount of “standards” in the industry.
To check your bottom bracket bearings, remove the crank arms and then spin the bearings with your fingers to feel for any unusual resistance or grinding, which would be a reason for needing replacement. If the bottom bracket bearings appear fine, then grease your crank spindle before reinstalling and torque down all the bolts to spec.
Pedals can also be a source of creaking, so remove and re-grease your pedal threads before reinstalling, and if you are using Sram cranks be sure to include the thin metal spacer when reinstalling.
Saddle and Seat Post
To check if your saddle or seat post is causing the creak, stand next to your bike and physically try to wiggle the saddle with your hands. If that doesn’t work you can also find a quiet road (or driveway) and coast along while sitting on the bike, with your feet dangling to the side, and wiggle your bike slightly to see if the creak is audible.
Before removing your saddle or seat post, use a marker or pieces of tape to mark your seat post height and saddle position in the seat post, which will make reassembly easier. Then remove the seat post, clean and grease both the seat post surface that goes inside the frame as well as inside the frame’s seat tube (a rag at the end of a screwdriver works great here) and reinstall.
Likewise for the saddle itself, remove it from the seat post, grease the saddle rails, and reinstall it while tightening bolts with a torque wrench to spec. The points where the saddle rails go into the saddle itself may also need some lubrication, either with grease if you can access it or a few drops of
Spokes Creak
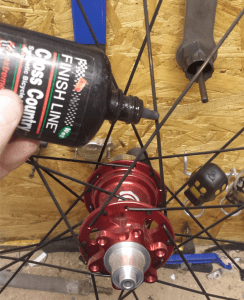 Creaking at the wheels is often a sign that your spokes are loose and need to be tightened. Unless you are familiar with building or tensioning wheels, then I would recommend taking your wheels to a local bike shop to have your wheels tensioned. However, if your spokes are tight and you still hear creaks, chances are the creaks are caused by spokes rubbing against each other.
Take a bottle of
Quick Release Levers
 Quick-release levers are perhaps the most overlooked common cause of creaking but are also easy to remedy. Loosen the quick-release levers and apply some grease to the contact surfaces of both the quick release mechanism as well as the dropouts of your frame or fork. Then take a bottle of
Tighten the lever back down so your wheel is tight (the lever should leave a temporary mark in your hand if it is tight enough) and then wipe away the excess grease and
Why a Torque Wrench?
 By now you’ve surely noticed that I mentioned using a torque wrench a whole lot today. Torque wrenches are a very important part of any home mechanic’s tool collection and are becoming increasingly important as bikes are becoming lighter in weight and are using carbon fiber components. Improperly tightening or over-tightening bolts can lead to stripped threads and crushed carbon, so it is extremely important to torque bolts to the manufacturer’s specifications.
You can get aninexpensive beam-style torque wrench like the one I use (Check latest price at Amazon) to use with a screwdriver bit set and ¼” socket that you have in your toolbox, or spend a bit more on a more portable torque wrench like this one I have and recommend from Park Tools, but that small investment upfront is a lot cheaper than what it will cost to replace that $200 carbon seat post or $400 boutique hub you just bought because you tightened down a bolt too much.
And as always, if you don’t feel comfortable with performing repairs, don’t be afraid to take your bike to a local bike shop, or find a mechanically inclined friend to help. There’s no shame in asking for help, and you may even find the opportunity to learn how to do it yourself the next time.
Things mentioned above that I use (Amazon links for current prices):
– Performance Tool M195 0-80 in/lb & 0-7 Newton-meter Beam Style Torque Wrench
– TEKTON 14102 1/4-Inch Drive by 1/4-Inch Shallow Socket, Cr-V, 6-Point
– YXGOOD 33 Piece Chrome Vanadium Steel Screwdriver Bit Set with Plastic Storage Case
– Park Tool ATD-1 Adjustable Torque Driver
Rob is a New England native who has been living in Charlotte, North Carolina, since 2012. Upon learning how to ride at the age of five he quickly found that everything is better on a bicycle, and hasn’t stopped riding since.


